JavaScript General Concepts
What is JavaScript?
JavaScript is a programming language that allows you to implement complex features on web pages and modify their behavior — whenever a web page does more than just display static information — showing timely content updates or interactive maps, animated 2D/3D graphics, video, etc. — JavaScript is involved.
Here is a simple example of how the three core technologies work together:
It is the third layer of standard web technologies. JavaScript is a scripting language that allows you to create dynamic updated content, control multimedia, animate images, and almost anything else.
JavaScript is a fairly compact but very flexible language. Developers have written a wide variety of tools based on this language, unlocking a whole range of additional functionalities with minimal effort.
These functionalities include:
- Application Programming Interfaces. An Application Programming Interface (API) is a set of programming standards and instructions that allow systems or software components to interact seamlessly, facilitating data exchange. APIs built into web browsers offer functionality such as dynamic HTML creation and CSS styling, capturing and manipulating a video stream from the user's webcam, or generating 3D graphics and audio samples.
- Third-party APIs – Allow developers to incorporate functionality into their websites from other content providers, such as Twitter or Facebook.
- Third-party frameworks and libraries – You can apply these to HTML to quickly create websites and applications.
Since this article is just an introduction to the JavaScript language, we will not go into detail at this stage about the differences between JavaScript and the various tools listed above.
Below I will present a few aspects of the language and you'll also play with some browser API functions. Let's have some fun!A Simple "Hello World" Example
JavaScript is truly a fantastic technology, and as you learn this language, you'll be able to create extremely engaging websites for users.
However, becoming comfortable with JavaScript is not that easy — it requires many, many hours of practice. If you come across tutorials with titles like "Learn JavaScript in just one hour" or "JavaScript – from beginner to advanced in just three days", know that these are just very bad jokes.
To become an expert in JavaScript, it takes years of practice.
To begin, I'll show you how to add JavaScript code to your page by creating a classic “Hello world!” example.
If you've followed the instructions so far, then you already have this structure created:
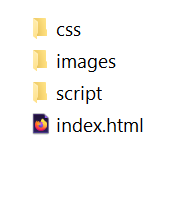
- First, create a file named main.js in the folder named script.
- Then, in index.html insert the following line just before the closing <body> tag. This is the path to the main.js file:
<script src="script/main.js"></script>
- Now, add the following code to the main.js file:
  let myHeading = document.querySelector('h1');
  myHeading.textContent = 'Hello world!';
- Finally, make sure to save the files and load index.html in the browser. You should now have a page just like the one in the example below:
☞ The reason we placed the <script> element at the bottom of the HTML file is that HTML is loaded by the browser in the order it appears. If JavaScript is loaded first and is supposed to affect HTML below it, it might not work because JavaScript would be loaded before the HTML it's meant to modify. Therefore, inserting JavaScript at the bottom of the HTML page is often the best strategy.

What actually happens in the example above?
The title text has now been changed to “Hello world!” using JavaScript. We did this by first using a function called querySelector() to retrieve the title and store it in a variable named myHeading. This is very similar to what we did using CSS selectors. When you want to do something with an element, you must first select it.
Then, we set the value of the textContent property of the myHeading variable (which represents the content of the H1 element) to “Hello world!”.
☞ Both features we used above are parts of the Document Object Model (DOM) API, which allows you to manipulate elements in documents.
Brief Introduction to the JavaScript Language
Let's explain a few of the basic features of the JavaScript language to give you a better understanding of how everything works. It's worth noting that these features are common to all programming languages, so if you master these fundamentals, you'll be able to create almost anything.
JavaScript Variables
Variables are containers in which you can store values or expressions. A variable can have a short name, like x, or a more descriptive one, like myHeading.
You start by declaring a variable with var (less recommended) or with let, followed by any name you want to use:
let variableName;
☞ The semicolon at the end of a line indicates where a statement ends and is only required when separating multiple statements on a single line. However, it is considered good practice to include them at the end of every statement.
JavaScript is case-sensitive – variableName is a different variable from variablename.
After declaring a variable, you can assign it a value:
variableName = 'Victor';
You can do both operations on the same line:
let variableName = 'Victor';
You can retrieve the value simply by calling the variable by name:
variableName;
After assigning a value to a variable, you can later choose to change it:
  let variableName = 'Victor';
  variableName = 'Maria';
Keep in mind that variables can hold values of different data types:
| Variable | Explanation | Example |
|---|---|---|
| String | A sequence of text known as a string. To specify that the value is a string, you must enclose it in quotes. | let variableName = 'Victor'; |
| Number | A number. Numbers do not have quotes around them. | let variableName = 12; |
| Boolean | A true/false value. The words true and false are special keywords in JS and do not require quotes. | let variableName = true; |
| Array | A structure that allows you to store multiple values in a single reference. | let variableName = [1,'Victor','Maria',10]; We refer to each member of the array like this: variableName[0], variableName[1], etc. |
| Object | Basically, anything. Everything in JavaScript is an object and can be stored in a variable. Keep this in mind as you learn. | let variableName = document.querySelector('h1'); All of the examples above as well. |
Why do we need variables? Well, variables are necessary to make things much more interesting in programming. If values can't change, then you can't do anything dynamic, like customizing a greeting message or changing the displayed image in a gallery.
Comments
Comments are essentially short pieces of text that can be added to code and are ignored by the browser. You can insert comments in JavaScript code just like you can in CSS or HTML:
  /*
  I am an example of a comment
  */
If your comment doesn't contain line breaks, it's easier to write it like this:
// This is a comment
JavaScript Operators
An operator is a mathematical symbol that produces a result based on two values (or variables). Operators are used to manipulate, combine, and modify data in a program or script. In the table below, you can see some of the simplest operators along with a few examples to try in the JavaScript console.
| Operator | Explanation | Symbol(s) | Example |
|---|---|---|---|
| Addition | Used to add two numbers or to concatenate two strings together. | + | 6 + 9; "Hello " + "world!"; |
| Subtraction, multiplication, division | These do what you'd expect them to do in basic math. | -, *, / | 9 - 3; 8 * 2; // multiplication in JS uses an asterisk 9 / 3; |
| Assignment | You've already seen this: it assigns a value to a variable. | = | let variableName = 'Victor'; |
| Equality | Tests whether two values are equal to each other and returns a true/false (boolean) result. | === | let variableName = 3; variableName === 4; |
| Not, inequality by value or data type | Returns the logical opposite of what precedes it; turns a true into a false, etc. When used alongside the Equality operator, the negation operator tests whether two values are not equal. | !, !== | For “Not”, the base expression is true, but the comparison returns false because we negate it: let variableName = 3; !(variableName === 3); “Does-not-equal” gives practically the same result with different syntax. Here we test whether “variableName is NOT equal to 3”. It returns “false” because “variableName” IS equal to 3: let variableName = 3; variableName !== 3; |
There are many other operators, but for now this is enough.
Conditional Statements
Often, when writing JS code, you need to perform different operations based on different decisions. To do this, you use conditional statements in your code.
Conditionals are code structures that allow you to test whether an expression returns true or not, running alternative code based on its result. A very common form of conditionals is the if ... else statement. For example:
let applePie = 'cinnamon';
  if(applePie === 'cinnamon') {
  alert('Hooray, I love cinnamon in apple pie!');
  } else {
alert('Ahhh, but I really like cinnamon...');
}
The expression inside if(...) is the test — it uses the identity operator (as described above) to compare the variable applePie with the string cinnamon to see if the two are equal. If this comparison is true, the first block of code is executed, and if it's not true, the first block is skipped and the second block of code after the else statement is executed.
JavaScript Functions
Functions are a way of "wrapping" functionality that you want to reuse. A function will be executed when an event occurs or when it is called. When you need a certain functionality (procedure), you can call a function by its name instead of rewriting the entire code each time. You've already seen some uses of functions above, for example:
let myHeading = document.querySelector('h1');
alert('hello!');
These functions, document.querySelector and alert, are built into the browser for you to use whenever you want.
If you see something that looks like a variable name but has parentheses – () – after the name, it's probably a function. Functions often have arguments – bits of data they need to do their job. These go inside the parentheses, separated by commas if there are multiple arguments.
For example, the alert() function causes a pop-up window to appear in the browser window, but we need to give it a string as an argument to tell the function what to display in the pop-up box.
The good news is that you can define your own functions — in the following example we'll see a simple function that takes two numbers as arguments and multiplies them:
function multiply(num1,num2) {
  let result = num1 * num2;
  return result;
}
Try running the function above in the console, then test it with different arguments. For example:
  multiply(4, 6);
  multiply(25, 25);
  multiply(1.5, 3);
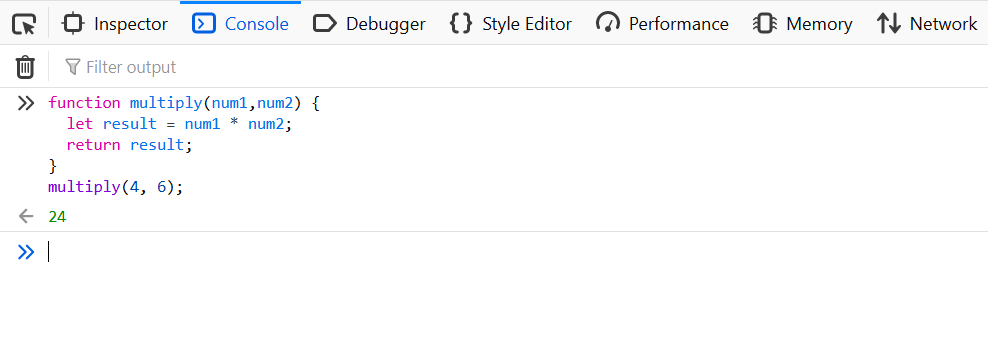
☞ The return statement tells the browser to return the result variable from the function so that it's available for use. This is necessary because variables defined inside functions are only available within those functions. The return statement is used to specify the value returned by a function and must be included in any function that returns a value.
JavaScript Events
Real interactivity on a website requires events. These are code structures that listen to things happening in the browser and run code in response.
Using JavaScript, we can create dynamic web pages. Each element on a web page has a certain number of events that can trigger a script. For example, we can use the onClick event of a button to indicate which function will be executed if the user clicks that button. Events are defined in HTML tags.
Examples of events:
- a mouse click;
- loading a web page or an image;
- moving the mouse over a certain area of the web page;
- selecting an input field from an HTML form;
- pressing a key.
☞ Events are normally associated with functions, which will not be executed until the event occurs.
The most obvious example is the click event, which is executed by the browser when you click on something with the mouse. To demonstrate this, enter the following code in the console, press enter, then click on the current web page (outside the console):
document.querySelector('html').onclick = function() {
  alert('Ouch! Stop with those clicks!');
}
There are many ways to attach an event to an element. Here we select the <html> element, setting its onclick property equal to an anonymous function (i.e., without a name), which contains the code we want to run when the click event occurs.
For example,
document.querySelector('html').onclick = function() {};
is equivalent to,
  let myHTML = document.querySelector('html');
  myHTML.onclick = function() {};
just shorter.
Let's Improve Our Website
Now that we've learned some basic JavaScript elements, let's add a few interesting functions to our website to make it more interactive.
Let's Change the Image
We'll add an additional image to our website using other DOM-API functionalities and JavaScript code to toggle between the two when clicking on the image.
- First, find another image you want to display on the site. Make sure it has the same size as the first image or as close as possible.
- Save the image in the images folder.
- Access the main.js file from the script folder, delete the existing Hello world! example, copy the code below, paste it into the file, replace image-2.extension with the name of the image you'll use, and save.
let myImage = document.querySelector('img');

myImage.onclick = function() {
    let mySrc = myImage.getAttribute('src');
    if(mySrc === 'images/image-1.extension') {
      myImage.setAttribute('src','images/image-2.extension');
    } else {
      myImage.setAttribute('src','images/image-2.extension');
    }
}
- Load index.html in the browser. Now, when you click on the image, it should switch to the other image.
Let's see what happens in the example above. We store a reference to the <img> element in the variable myImage. Next, we set the event-handling property onclick equal to an unnamed function (an “anonymous” function). Now, every time this element is clicked, the following actions occur:
- we retrieve the value of the image's src attribute;
- we use a conditional statement to check if the src value is equal to the path
of the original image:
- if it is, we change the src attribute value to the path of the second image and force it to load inside the <img> element;
- if it's not (which means it must have already changed), the src value switches back to the original image path, returning to the initial state.
Let's Add a Personalized Welcome Message
Next, we'll add another code snippet that changes the page title to a personalized welcome message when the user first arrives on the site. This welcome message will persist if the user leaves the site and returns later — we'll save it using the Web Storage API. We'll also include an option to change the user and therefore the welcome message whenever needed.
- In index.html, add the following line <button>Change user</button> just before the <script> element:
  <button>Change user</button>
  <script src="main.js"></script>
  </body>
</html>
- In main.js, place the following code at the bottom of the file exactly as written — it references the new button and the title, storing them in variables:
  let myButton = document.querySelector('button');
  let myHeading = document.querySelector('h1');
- Now add the following function to set the personalized greeting — this won't do anything yet, but we'll fix that shortly:
function setUserName() {
  let myName = prompt('Enter your name');
  localStorage.setItem('name', myName);
  myHeading.textContent = 'Welcome, ' + myName;
}
This function contains another function called prompt(), which creates a dialog box, similar to an alert. However, prompt() asks the user to enter some data, storing it in a variable after the user presses OK.
In this case, we ask the user to enter their name. Next, we call an API called localStorage, which allows us to store data in the browser and retrieve it later. We use the local storage function localStorage.setItem to create and store a data item named “name”, setting its value to the myName variable that contains the user's input. Finally, we set the textContent of the title to a string plus the recently stored user name.
- Then, we add the if...else block — which we could call initialization code, because it structures the application when it first loads:
if(!localStorage.getItem('name')) {
  setUserName();
} else {
  let storedName = localStorage.getItem('name');
  myHeading.textContent = 'Welcome, ' + storedName;
}
The block above first uses the negation operator (NOT, represented by !) to check if the name data exists. If not, the setUserName() function is run to create it. If it does exist (meaning the user set it during a previous visit), we retrieve the stored name using getItem() and set the textContent of the title to a string plus the user's name, just like we did with setUserName().
- Finally, we set the onclick event handler on the button below. When clicked, the setUserName() function is run. This allows the user to set a new name whenever they want by pressing the button:
myButton.onclick = function() {
  setUserName();
}
Now, when you visit the page for the first time, it will ask for your username and then display a personalized message. You can change the name anytime by pressing the button. As a bonus, because the name is stored in localStorage, it persists even after closing the site, keeping the personalized message when you open the page again!
A null username?
When you load the page and use the dialog box asking for your username, try pressing the cancel button. You'll likely see the title “Welcome, null”. This happens because when you cancel the name input, the value is set to null — a special value in JavaScript that basically means the absence of a value.
Also try pressing OK without entering any name — you should see a title that says “Welcome”, for fairly obvious reasons.
If you want to avoid these issues, you can check whether the user entered null or an empty name by updating the setUserName() function like this:
function setUserName() {
  let myName = prompt('Enter your name');
  if(!myName || myName === null) {
    setUserName();
  } else {
    localStorage.setItem('name', myName);
    myHeading.innerHTML = 'Welcome, ' + myName;
  }
}
The explanation is that if myName has no value or its value is null, you run setUserName() again. If it has a value (meaning the above conditions are false), then you store the value in localStorage and set it as part of the heading text.
The full code block should look like this:
// Image switching
let myImage = document.querySelector('img');

myImage.onclick = function() {
    let mySrc = myImage.getAttribute('src');
    if(mySrc === 'images/star.jpg') {
      myImage.setAttribute('src','images/star1.png');
    } else {
      myImage.setAttribute('src','images/star1.png');
    }
}

// Personalized message

let myButton = document.querySelector('button');
let myHeading = document.querySelector('h1');

function setUserName() {
  let myName = prompt('Enter your name');
  if(!myName || myName === null) {
    setUserName();
  } else {
    localStorage.setItem('name', myName);
    myHeading.innerHTML = 'Welcome, ' + myName;
  }
}

if(!localStorage.getItem('name')) {
  setUserName();
} else {
  let storedName = localStorage.getItem('name');
  myHeading.innerHTML = 'Welcome, ' + storedName;
}

myButton.onclick = function() {
  setUserName();
}
If you followed all the instructions in this article, you should have a page that looks like this:
I will end this section with a very suggestive image regarding the abusive use of the JavaScript language.