HTML – Introduction
HTML – XHTML – XML
Tim Berners-Lee published a document called "HTML Tags" in 1991. HTML was developed by the World Wide Web Consortium (W3C) and the Web Hypertext Application Technology Working Group in 1993.
The first standard was HTML 2.0 in 1995, followed by HTML 4.0 in 1997, which became stable and universally accepted, including by browser vendors who until then had even created their own proprietary tags.
HyperText Markup Language (HTML) is a markup language used to create web pages that can be displayed in a browser. The purpose of HTML is primarily to present information — paragraphs, fonts, tables, etc.
The first version was released in 1993, and the most recent on February 4, 2014 (HTML5).
In 2007, W3C adopted the HTML5 specifications developed by WHATWG as part of Web Application 1.0.
Currently, two versions of HTML are being developed:
- one by W3C, namely HTML 5.2 and likely HTML 5.3,
etc.
- one by WHATWG, simply called HTML, with constant updates and revisions.
HTML5 is now essentially a collection of individual modules with different specifications focused on application development.
Key websites offering detailed information about HTML:
HTML, together with CSS and JavaScript, forms a triad — a cornerstone of the core technologies used in the World Wide Web for Front-End Development.
Without HTML, websites do not exist. CSS controls how a web page looks, JavaScript controls how a web page behaves, and HTML represents the basic structure. If we remove the HTML structure of a web page, that page essentially ceases to exist.
On the other hand, a web page containing only HTML code can still exist. That’s why HTML is the first markup language that must be learned and is absolutely indispensable.
eXtensible HyperText Markup Language, or XHTML, is a markup language with the same expressive capabilities as
HTML, but with stricter syntax.
It was developed by the W3C in the 2000s.
XHTML can be considered a cross between HTML and XML — in many ways, it’s a reformulation of HTML in XML. XHTML 1.0 became a World Wide Web Consortium (W3C) recommendation on January 26, 2000.
Extensible Markup Language (XML) is a markup meta-language recommended by the Web Consortium for creating other markup languages such as XHTML, RDF, RSS, MathML, SVG, OWL, etc.
These languages form the XML language family.
The XML meta-language is a simplification of SGML (from which HTML also originates) and was designed for data transfer between applications on the internet and for describing data structures.
XML is now also a model for storing unstructured and semi-structured data in native XML databases. XML data can be used within HTML, allowing for quick identification of documents via search engines.
With the help of JavaScript, PHP, and other code, XML files can be embedded into web pages — the most illustrative example is the RSS system, which uses an XML file to transport information from one web page to multiple others.
What HTML Is and Isn’t
HTML is a markup language that defines the structure of a website’s content.
HTML is not a programming language.
HTML is the markup language we use to structure and give meaning to web content — for example, defining paragraphs, headings, and data tables, or embedding images and videos into a page.
The HTML language is easy to learn and is based on using tags to define different elements on the page and how
those elements interact with each other (<p> is for paragraphs, <nav> for
navigation, etc.).
An HTML tag is usually defined as a set of characters that form a formatted command for a web page. At the core of HTML code, tags provide instructions for the visual content on the Web.
Let’s look at the following line of content:
My cat is very picky.
If we want this line of text to stand alone, we could specify that it is a paragraph by enclosing the line in paragraph tags, like this:
<p>My cat is very picky.</p>
Anatomy of an HTML Element
Let’s analyze the paragraph above in detail.
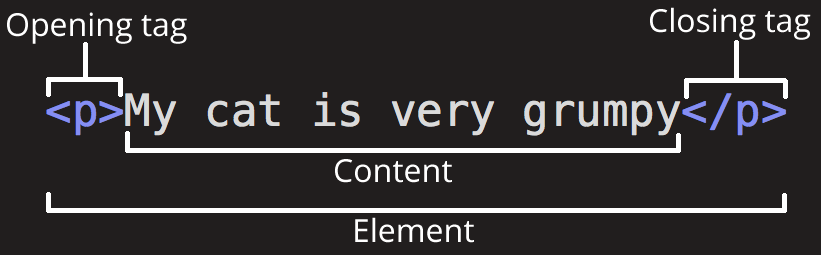
The element above is composed of the following components:
- Opening tag (which marks the beginning of an element), represented by the element name (in this case p), wrapped in angle brackets;
- Closing tag (which marks the end of the element), includes a forward slash before the element name. Omitting the closing tag is a common mistake made by beginners and can lead to unexpected results;
- Element content, which in this case is the actual text;
- The element, which consists of the opening tag, the closing tag, and the content between them.
HTML elements can have attributes, which look like this:

Attributes contain information about the element that will not be displayed on the page. In this case, class is the attribute name, and nota is the attribute value.
The class attribute acts as an identifier for the element, which can be used to target it with styling information (to customize the element using CSS).
An attribute should always include the following components:
- A space between it and the element name (or the previous attribute, if there are multiple);
- The attribute name followed by an equals sign;
- The attribute value enclosed in quotation marks.
Nested Elements
You can place HTML elements inside other HTML elements, following a set of rules.
For example, if we want to emphasize something — like the phrase "My cat is very picky" — we could wrap the word very in a <strong> element, which means strong emphasis.
<p>My cat is <strong>very</strong> picky.</p>
Attention! You must ensure that elements are properly nested. The last element opened is the first one to be closed.
In the following example, we’ve made a mistake to demonstrate incorrect nesting:
<p>My cat is <strong>very</p> picky.</strong>
If such an error occurs, the browser will try to display the content, but the result may be unexpected. In some cases, the content may not be displayed at all.
Empty Elements
Some elements have no content and are called empty elements. An example of a contentless element is the <img> element.
<img src="image.jpg" alt="test-image">
The img element contains two attributes, but there is no closing tag </img> and no internal content, because an img element does not wrap content to affect it in any way. Its purpose is to display an image on the page, at the location where it appears.
Anatomy of an HTML Document
Now we’ll analyze how individual elements are combined to form a complete HTML page.
Let’s review the code introduced in our first page index.html:
Here, we have the following elements:
- <!DOCTYPE html> – This declaration is needed to tell the web browser which version of HTML is being used, so it knows how to render the page content. Back when HTML was just a baby, around 1992, DOCTYPE acted like a link to a set of rules that the HTML page had to follow to be considered valid. Today, the doctype declaration is much simpler and absolutely necessary to ensure correct document behavior. That’s all you need to know for now.
- <html></html> – This element wraps all the content of a page and is sometimes called the root element.
- <head></head> – This element acts as a container for a whole series of elements you want to include in the page without displaying them to users. It includes the page title between <title></title> tags, <meta> tags, and may contain CSS code, scripts, and links to external files.
- <meta charset="utf-8"> – This element defines the character set as utf-8, which the document will use. It includes most characters from the majority of written languages. The standard character encoding charset="utf-8" is required for every page and informs the user agent (web browser) about the data format used, allowing it to choose the correct encoding to render the site. This encoding system is the successor to ASCII (128 characters) and ISO-8859-1 (256 characters, used in HTML4).
- <title></title> – This element sets the page title, which appears in the browser tab where the page is loaded.
- <body></body> – This element wraps all the content you want to display to users (text, images, videos, etc.).
Images
Let’s now return to the img element.
As already mentioned, this element includes an image in the page, at the position where it appears in the HTML document. It does this through the src (source) attribute, which contains the path to the image file.
<img src="image.jpg" alt="test-image">
We’ve also included the alt (alternative) attribute, which contains descriptive text for the image, intended for users who cannot see the image, probably for the following reasons:
- They have visual impairments and use screen readers to hear the alternative text.
- Something went wrong and the image wasn’t loaded on the page.
Try deliberately changing the path to the image file to an incorrect one, then save and load the page in the browser.
<img src="wrong-path/star.svg" alt="test-image">
The descriptive text provided using the alt attribute should describe as accurately as possible what the image represents. For example, if we display an image showing a certain landscape from Maramureș, the alternative text should be: "Beautiful landscape from Maramureș", or other variations that faithfully describe what the image represents.
Marking Text in the Page
Next, I will present some of the most important HTML elements used for marking text in a page.
Headings
Headings or header elements allow you to specify that certain parts of the content are titles or subtitles. Just like in a book that has a main title and subtitles for various chapters, a web page can be structured the same way.
An HTML document can contain 6 heading levels, from h1 to h6, but you will commonly use only the first 3–4.
<h1>Main Title</h1>
<h2>Secondary Title</h2>
<h3>Subtitle One</h3>
<h4>Subtitle Two</h4>
Now, add an h1 heading to the index.html page, just above the img element.
☞ You will notice that the H1 heading has a default style. Do not use heading elements just to make the text appear larger and bolder. For that, we will use CSS.
Now the page we’re working on should look like this:

Paragraphs
As already explained, the <p> elements are used to mark regular text.
Now, add 2–3 paragraphs directly below the img element and save. Programmers use "Lorem Ipsum" text in these situations.
Lorem Ipsum is dummy text — standard placeholder text used to fill a page and get an approximate idea of how the site will look when finished.
Search "Lorem Ipsum" on Google and you’ll find several websites from which you can copy and use filler text.
Now, the page we’re working on should look something like this:
Lists
A large part of web content is made up of lists, and HTML has special elements for them.
The most common types of lists are:
- Unordered lists – lists where the order of items doesn’t matter (like a shopping list), and they are wrapped in a <ul> element.
- Ordered lists – lists where the order matters (like a recipe, for example), and they are wrapped in a <ol> element.
Each list item is placed inside a <li> element.
For example, we could transform part of the following paragraph into a list,
<p>In this course, we will learn about HTML, CSS, and JavaScript to become good designers and programmers.</p>
like this:
<p>In this course, we will learn about:</p>
<ul>
  <li>HTML,</li>
  <li>CSS,</li>
  <li>JavaScript,</li>
</ul>
<p>to become good designers and programmers.</p>
Try adding an unordered or ordered list to the index.html page so that it looks something like this:
Links
Without links, the web wouldn’t exist — and that says everything about their importance.
To create a link (a connection), we use the <a> element — "a" being short for anchor.
To create a link, follow these steps:
- Choose some text. I’ve chosen: "My first website".
- Wrap the text in an a element.
<a>My first website</a>
- Add the href attribute like this:
<a href="">My first website</a>
- Fill in the value of the href attribute with the web address you want to link to, like this:
<a href="https://google.com">My first website</a>
Now, add at least one link to the index.html page.
You may get unexpected results if you omit the https:// or http:// part, called the protocol. After creating a link, click on it to make sure it points exactly where you want.
☞ The href attribute stands for hypertext reference.
Conclusion
If you’ve followed all the instructions so far, then your index.html page should look something like this: